MINI BIG RIGS – Tender Rescue 1
Wellington Airport Fire Service
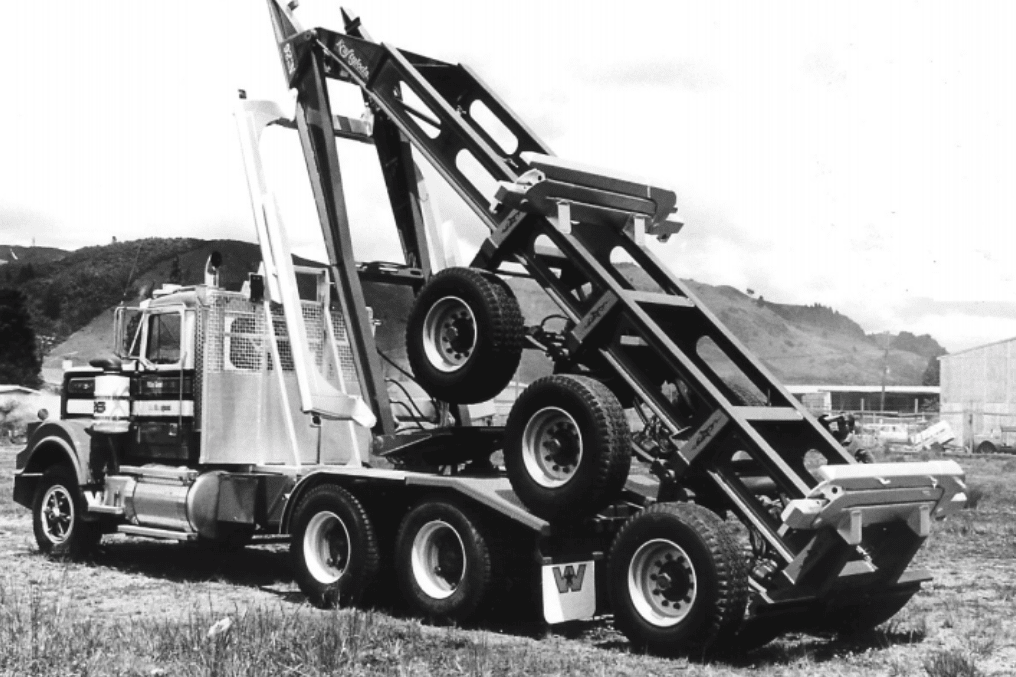
Mills-Tui Stryker Crash Fire
Tender – Rescue 1
With perseverance comes reward, and this scratch build project by Tim O‘Halloran, some 14 years in the making, is testament to this.

Photo: The completed scratch built model belies the 14 years of blood, sweat and tears that went into its creation by Tim O‘Halloran.
Tim O‘Halloran is an experienced hand at model truck building, starting at age nine. As life got busy the model building had to take a back seat; however working alongside a fellow model truck builder in 2003 reignited the passion for Tim, and the production line was kicked into gear again.
Tim‘s working career has involved all manner of trucks and machinery; from tippers and diggers through to linehaul, there is not much Tim hasn‘t driven. In 2005 Tim seized an opportunity to move into a role with the Wellington Airport Fire Service. During a conversation one afternoon with workmates, Tim‘s boss challenged him to have a go at building a scale model of the R1 Mills-Tui Stryker crash tender resident at their station. For Tim it was “Challenge accepted”. The build started immediately, collecting photographs and data from the actual machine. Tim based the calculations on a 1:24 scale build, beginning with bare sheets of plastic, a ruler and a knife. The model is 99.9% scratch built, right down to the wheels. The off-highway wheel and tyre sets were formed by resin casting, where a pattern of the individual wheel and tyre is handmade, then used to form a rubber mould that the resin is then cast into.
The tender is powered by a Series-60 Detroit. This proved troublesome as off-the-shelf solutions proved to be out of scale, so a pile of donor parts and a session of scratch building was the solution, forming a scale correct power plant for the model. One cool feature is the exhaust plumbing exiting the turbocharger made from flexible drinking straws.
 |
 |
 |
 |
The level of detail in the build is impressive: peering through the windows into the cab you will see a BA set in the passenger seat alongside a box of surgical gloves positioned exactly as it is in the real tender. The paint used was left over from the painting of the real Stryker back in the 80s and was found by Tim‘s son Regan. Signage was provided by Kapiti Signs. Tim tells how he lost track of the time spent on this model. “I started it in 2005 and finally finished it just in time for the Easter Nationals in Napier this year, so some 14 years on the work bench. There were days that I could not stand the look of it; the ladder on the roof for example took four attempts to get it right, but here it is done.”
Seeing first-hand the build quality of this one-off model you can appreciate there would have been those days of frustration where you would have regretted accepting the challenge, however top marks to Tim‘s resolve to stay connected to the build and see it through to completion.

Photo: Tim‘s daily drive and inspiration for the build.
Our own build – tools
We‘re under way on our model build. This month we‘re looking at basic tools. Like any task, the quality of the finish comes down to having the correct tools for the task. This does not imply you need to invest heavily. Your local hobby store will assist with selecting the basics, but here‘s my list of essentials.. Hobby knife – you will use this every stage of the build, cutting parts from the sprue (grid) as well as cleaning and moulding flash from parts. It should be kept sharp. Most good hobby stores stock a starter kit that comprises a knife handle and assorted blades. Needle files – when you cut parts away from the sprue, invariably there will be flash or residue that can compromise the fit. Use a needle file to ensure a nice, clean and straight fit between parts.
Tweezers – a common everyday set of tweezers is a must-have in the toolbox. These are helpful for many tasks, especially holding smaller parts during final assembly. Glue/cement – the liquid-based solvents of today don‘t suffer from the stringing like glues of the past.
There are two common methods to apply modern solvents
1 – Directly to the surfaces being bonded, softening the plastic.
Once the parts are together a little more can be applied with a brush.
2 – Bring the two parts together dry, then while held in place apply the solvent with the brush directly to the seam. Capillary action draws the solvent directly into the connecting seam.

Photo: Tools of the trade – It may seem daunting, however a modest selection to get you started is the key.
Acrylic putty/filler – you can certainly build a model without this, however it does improve the level of finish. Packaged similar to toothpaste, you apply it with a small modeller‘s spatula (old butter knives are great as well), over the dry bonded seam between two parts and leave to dry. The drying time varies depending on products, the amount applied, and humidity, however you can generally work the putty/filler after 24 hours.
Sandpaper – plastic is fragile, so a fine grit sandpaper is required. An initial light sanding of a bonded and filled seam might require a 240-grit paper to work the surface into shape, moving towards 400 and 800 grit in preparation for paint. The trick with sanding is patience, Paints – purchase a small selection of primary and common colours. Take the time to have a think about any specialised colours you might require that are specific to the model you are building e.g. engine block and gearbox colours. Most paints today are water-based acrylics, making cleaning easier and extending brush life.
This month‘s task is to compile your inventory of tools and supplies and ready a space to set up your production line for the upcoming project.
![]()
![]()
![]()
![]()