
40th Anniversary Project – Torquing Bulldog Stage 4 – It’s in the detail
This month, as we prepare to paint the chassis of Torquing Bulldog, we add the extra detail to give the model that extra dash of realism.
Manufacturers of plastic model kitsets provide a fun challenge for model builders the world over, to piece together a three-dimensional jigsaw puzzle out of the box. With a little time and a good dose of patience, the end results can look spectacular. However, where the manufacturers drop the ball is in the smaller details. This leaves the door wide open for us as builders to add these extras – and lift the finish of the build to the next level.
At 1/25th scale, finer details like the brake lines from the air tanks out to the brake pots can be easily added. The first step is to track down a real truck of the same make and model as well as specification, and photograph the details you want to replicate. These images will give you all the information you are looking for: exact placement, correct proportions, as well as finished colours.
There are also obvious items we require for our Torquing Bulldog build that are not provided in the off-the-shelf kitset. The Ringfeder trailer coupling is one such piece. Once again, with a few reference photos, scraps of plastic and a dab or two of glue, this can also easily be scratch built and added to our build.
So now let the imagination and creativity run loose, and enjoy the opportunity at this stage of construction to lift the overall impact of your build.


Assemble the diesel tanks as per the instructions. Once completely set, you can add a level of realism by adding mesh to the steps to give the appearance of grip tread. This is easily cut with solid scissors, and then simply super-glued into place before you apply paint.


The scratch-building of a Ringfeder trailer coupling is easily achieved by breaking it down to its raw components, then carefully whittle the pieces one by one out of plastic, gluing them together as you go. Use needle files to can shape the form and achieve the end result.


Finding a real truck of the same make, model and specification as your project is extremely helpful. Grab your camera and take plenty of detail shots of all the areas you want to replicate. This way you have an accurate reference for placement, proportions and finished colours.


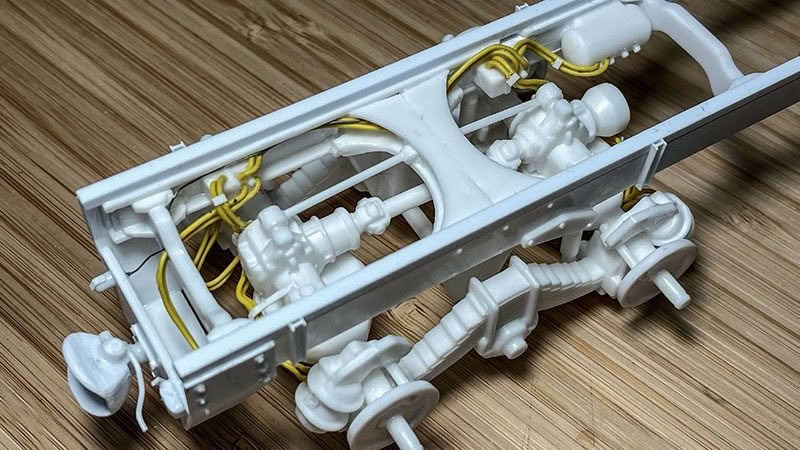
Following your reference photos of the real truck, study how the braking system is plumbed. You will find there are twin rubber hoses running out to each of the four brake pots. These brake lines can be replicated using fine plastic-insulated copper wire. Using small pieces of plastic, form the air line splitter fittings you find bolted to the diff housings. Using a pin vice/thumb drill, drill small holes to locate the copper wire at the required locations. Adding a small dab of super-glue to these drilled locations will help retain the copper wires. Do not forget to plumb up the Duo-Matic trailer coupling, as well as the electrical connection to the trailer.


